为单页应用程序集成
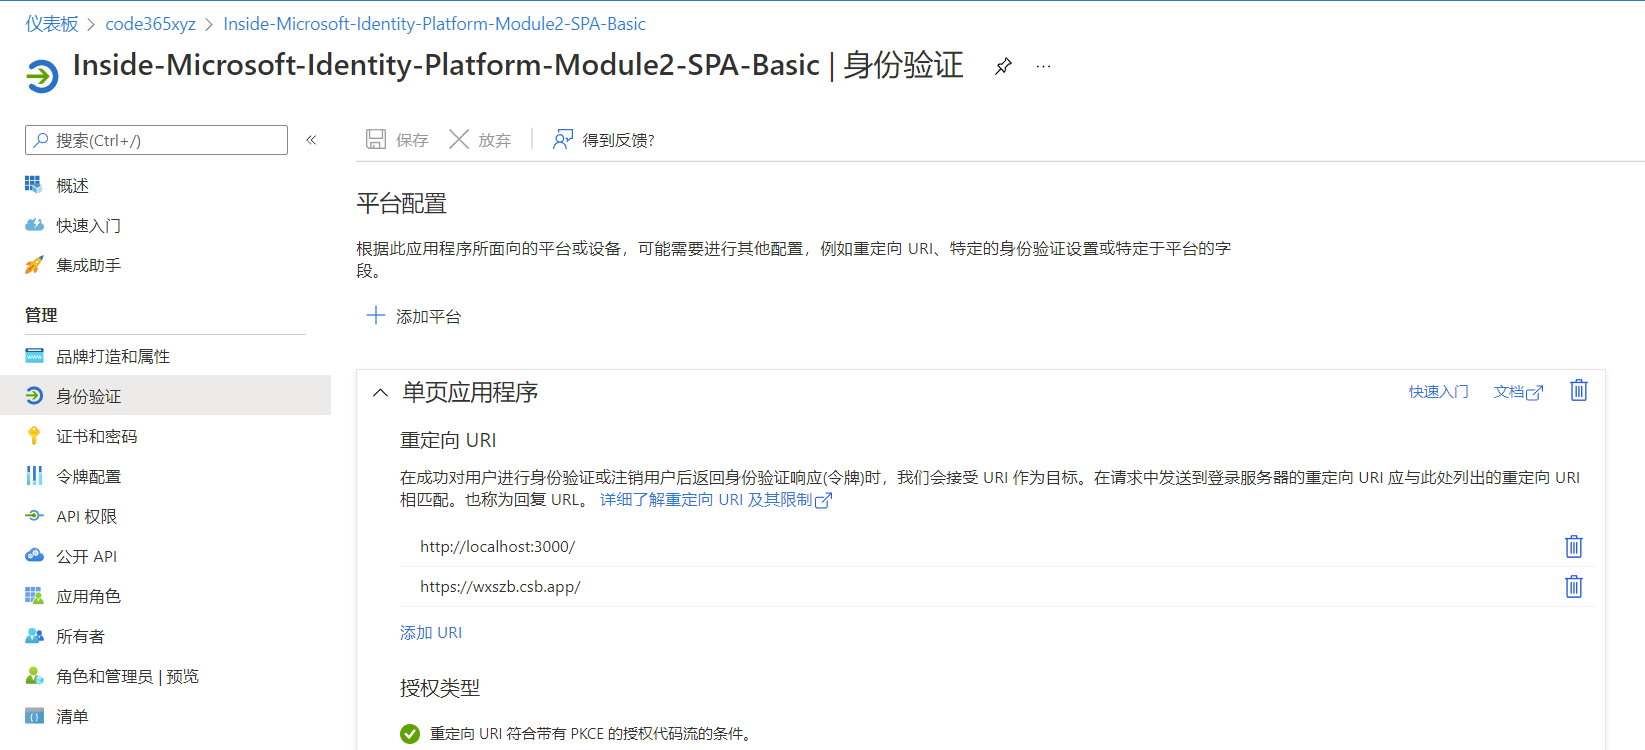
- 注册应用程序
- 创建React项目(本地或Codesandbox)
- 使用MSAL-react实现用户身份验证
- 通过Azure静态网站托管,使用内置支持
- 实现对Microsoft Graph资源的访问
- 与Microsoft Graph toolkit 集成
注册应用程序

创建React项目
- 本地
npx create-react-app spa-basic --template typescript - https://codesandbox.io
安装
@azure/msal-browser和@azure/msal-react两个包
使用MSAL-react实现用户身份验证
- 初始化应用程序
- 处理登录(login)和注销(logout)
- 弹出对话框
- 页面重定向
初始化
import { render } from "react-dom";
import { PublicClientApplication } from "@azure/msal-browser";
import { MsalProvider } from "@azure/msal-react";
import App from "./App";

const instance = new PublicClientApplication({
  auth: {
    clientId: "46abe5ec-ccf0-4805-a7b5-f622142b6854",
    authority://如果是多租户应用,则为 /common
      "https://login.microsoftonline.com/3a6831ab-6304-4c72-8d08-3afe544555dd"
  },
  cache: {
    cacheLocation: "sessionStorage"//还可以设置为localStorage
  }
});

const rootElement = document.getElementById("root");
render(
  <MsalProvider instance={instance}>
    <App />
  </MsalProvider>,
  rootElement
);
处理登录(Login)和注销(Logout)
function handleLogin(instance: IPublicClientApplication): void {
  instance
    .loginPopup()
    .then((v) => instance.setActiveAccount(v.account))
    .catch((reason) => alert(reason));
}

function handleLogout(instance: IPublicClientApplication): void {
  instance.logoutPopup();
}
请注意,还有 loginRedirect 和 logoutRedirect,但是在某些情况下是不能重定向的
账号信息
登录成功后可以获得如下的基本信息
export declare type AccountInfo = {
    homeAccountId: string;
    environment: string;
    tenantId: string;
    username: string;
    localAccountId: string;
    name?: string;
    idTokenClaims?: object;
};
通过Azure静态网站托管
基于Github进行CI&CD,内置各种模板,以及安全支持,现代静态网站(React+API)
配置安全性
在网站根目录下面创建 staticwebapp.config.json,默认支持 aad,github, twitter三种验证器,也支持自定义 OpenID Connect 提供程序。
{
    "routes": [
        {
            "route": "/*",
            "allowedRoles": ["authenticated"]
        }
    ],
    "responseOverrides": {
        "401": {
            "statusCode": 302,
            "redirect": "/.auth/login/aad"
        }
    }
}
在 React 应用中获取当前用户信息
在前端代码中直接请求一个特定的地址,就可以获取到当前用户信息。该信息其实是以Cookie保存在浏览器中的。请注意,这里的用户id 并不是用户在AAD中真正的id,而是每个应用都不一样的,有点类似于微信开发中的openid.
async function getUserInfo() {
    const response = await fetch('/.auth/me');
    const payload = await response.json();
    const { clientPrincipal } = payload;
    return clientPrincipal;
}
在 API 应用中获取当前用户信息
Azure 静态 Web 应用通过 Azure Functions 提供无服务器 API 终结点,如果网站启用了身份验证,则会自动地在头部中传递加密过的用户信息
module.exports = async function (context, req) {
  const header = req.headers['x-ms-client-principal'];
  const encoded = Buffer.from(header, 'base64');
  const decoded = encoded.toString('ascii');

  context.res = {
    body: {
      clientPrincipal: JSON.parse(decoded),
    },
  };
};
实现对Microsoft Graph资源的访问
- 获取access_token
- 使用SDK访问资源
获取 access_token
const getToken = async (
  instance: IPublicClientApplication,
  scopes: string[]
): Promise<string> => {
  const request = { scopes: scopes };
  try {
    const result = await instance.acquireTokenSilent(request);
    return result.accessToken;
  } catch (error) {
    try {
      const result = await instance.acquireTokenPopup(request);
      return result.accessToken;
    } catch (error) {
      throw error;
    }
  }
};
使用SDK 访问资源
安装 @microsoft/microsoft-graph-client 和 @microsoft/microsoft-graph-types
import { Client } from "@microsoft/microsoft-graph-client";
import { Message, User } from "@microsoft/microsoft-graph-types";

async function getUserProfile(token: string) {
  const client = Client.init({
    authProvider: (done) => done(undefined, token)
  });
  return client.api("/me").get();
}
与 Microsoft Graph toolkit 集成
- 官方提供组件,缩短开发时间
@microsoft/mgt-element @microsoft/mgt-msal2-provider @microsoft/mgt-react @microsoft/microsoft-graph-types - 美观而灵活,模板可定制
- 事件监听
初始化 (一般在Index.tsx中)
import { Providers } from "@microsoft/mgt-element";
import { Msal2Provider } from "@microsoft/mgt-msal2-provider";

Providers.globalProvider = new Msal2Provider({
  clientId: "397b5acf-6a97-4307-a87e-b8e691e54d41",
  authority:
    "https://login.microsoftonline.com/3a6831ab-6304-4c72-8d08-3afe544555dd",
  loginType: 0,
  scopes: ["User.Read", "Mail.Read"]
});
使用组件
import {Login,Agenda,FileList,People,Providers,ProviderState,} from "@microsoft/mgt-react";

function useIsSignIn(): [boolean] {
  const [isSignIn, setIsSignIn] = useState(false);
  useEffect(() => {
    const updateState = () => {
      const provider = Providers.globalProvider;
      setIsSignIn(provider && provider.state === ProviderState.SignedIn);
    };

    Providers.onProviderUpdated(updateState);
    updateState();
    return () => Providers.removeProviderUpdatedListener(updateState);
  }, []);

  return [isSignIn];
}
定制模板和监听事件
- 通过模板定制组件展现样式
- 通过监听事件响应用户操作
自定义查询 (使用Get组件)
// 定义一个模板来显示邮件
const EmailItem = (props: MgtTemplateProps) => {
  const message: Message = props.dataContext;
  return <div>{message.subject}</div>;
};

// 在界面合适地方使用Get组件
<Get scopes={["Mail.Read"]} resource="/me/messages">
    <EmailItem template="value" />
</Get>
课程反馈
你可以通过邮件 ares@xizhang.com 与我取得联系,也可以关注 code365xyz 这个微信公众号给我留言。
视频教程
点击这里 或扫码可以访问配套视频教程。
陈希章 2022年2月 于上海